Wednesday, November 17, 2021

Dark Shadows


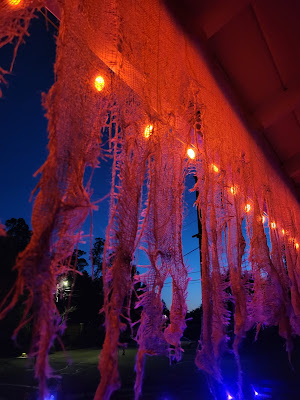
What to do with big, gaping vertical spaces other than investing time and space into big, vertical props?  Fill the void with shadows!  A low rent version of some of the projection FX that blends some of the new "technology" with some old school ingenuity.

The old place had lots of old growth hedges and trees that I never worried too much about height when it came to decorations.  If anything, I was hanging stuff down rather than building things up.  The new abode however recently had undergone a remodel, leaving the curbside clean and tidy and minus full grown plants.  I'd stand back taking in the new set up and fixate on these massive gaps from the bottom of the curtain to the tops of the props.  As much as I love Halloween, storage is always in the back of my mind as I dream up new stuff so how to fill these 6 foot gaps of reality that were interrupting the whole illusion?

I turned to a favorite source of inspiration - nature.  I had a small stash of Manzanita branches leftover from the new scarecrow so I leaned them up against the wall and uplight them with an Orange Fire & Ice light.  The result was even more than I had imagined.  The following night I took the little one on a short hike to my Manzanita branch source and we hauled out some lovely, twisty fallen/cut branches that were a solid 6 feet.  Total cost: the light, that's it!  And no need to hold onto the limbs, each year we can go on a new adventure and create a spooky effect with a bit of nature spiced with light.  Check it out!

During the day, the limbs look like a creepy, dying garden,
perfect witchy landscaping.


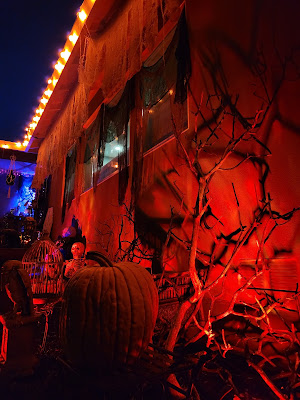
At night, the shadows climb the walls like the thorny
bushes a wicked stepmother might incant


Creepy Curtain: New and Im-BOO-ed


I've been using the trash bag method for my creepy curtain for years and figured this Halloween would be no different.  Spent 3 hours prepping panels, starting the clothesline & threading the first panel on.  Within minutes the wind had whipped the strands into intricate, knotted braids and they were caught up in the roof shingles & gutter.  So much for that.

Time for a new plan: burlap!   It's rather inexpensive if you buy it from the home improvement or garden store, around $12 with tax for a 3'x24' roll.  As with the trash bag method, plastic clothesline works great for this and also won't break the bank.

Tie of one end of the clothesline to an eye hook and then begin threading the other end along the long end of the burlap, weaving it in and out every 4"6" and about 1.5" - 2" from the edge.  Working in 3' sections, slide the the fabric all the way to the start and anchor in place with a piece of electrical tape.  Each section should then be "anchored so the weight of the burlap doesn't cause the line to sag too much.  Eye hooks are great for this but I was able to thread the line through the gaps in the boards of the eaves.   Repeat this process until you've covered the desired area and tie the clothesline off to another eye hook and tape the burlap to the line.

Starting at either end, use sharp scissors (I used my fabric scissors) and cut strips upwards towards the line, stopping with around 3"- 4" to spare.  The strips can be assorted sizes, I varied between 3"-8" so it wouldn't look too perfect.  After cutting a few strips, use your fingers to poke, pull and stretch imperfections into the burlap.  You can fray the edges as well but bear in mind if this is up all month long, the burlap will naturally start to fray so anything you do to it will get exaggerated.  You don't want to wind up with burlap threads all over the yard and little hanging from the eaves.

And there you go!  It was fun to watch it evolve over the month, getting creepier with each rain.  They weren't impervious to wind - I had to use a stick every day or so to unhook strips that had blown up onto the roof or were tangled in the gutters.  But that also made them look ever better with time - the rain gutter goop was so icky and fabulous!

The burlap can be dyed as well if you'd rather have a different color.  Dark greens and black both look great.


Home Improvement Haunt

Context is everything.  In the right environment a common item can take on a whole new spooky life with or without minimal adju...