Showing posts with label antique wood. Show all posts

Saturday, October 3, 2020

A Haunting Hiatus


Little Pearl is dark this year.  And my heart hurts.

It wasn't COVID that shut it down, but that had been weighing heavily on my mind as to whether or not we'd even have a Halloween this year.  Rather, it was a decision to move back to the area I grew up that I now find myself sitting here on the 3rd day of the greatest month of the year and all my haunting goodies are in a 16' POD somewhere in Oakland, CA.  And I am not handling it well.

What will all those kids who've come by to Trick-or-Treat think when instead of a Halloween feast for the eyes, they find only a "FOR SALE" sign?  Have I let them all down?

I will of course rebuild.  I told the realtor that my #1 priority was that my new neighborhood had to be Halloween friendly.  Because I'm coming in hot and with zombies.  On October 1st.  Every year.

In the meantime, I drive around with painful envy of the most meager of yard displays.  Even poorly done spider webbing makes me jealous (sort of, it's still pretty bad. Stretch it people!  Stretch it!)

What this has afforded me is the opportunity to tackle an idea I've been knocking around: the "$100 Haunt."  Halloween props, GOOD Halloween props that is, can be expensive; the high price a deterrent to decorating for just "one day."  Home Depot's 12ft Skeleton nearly came home with me when I went to get some soil in August.  At $300 and in the middle of a move, it would have been hard to explain to the Mr.

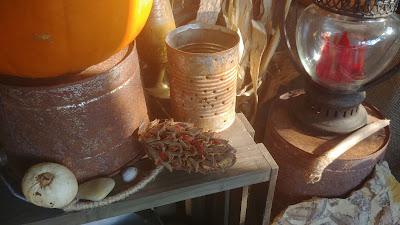
You can pull off any number of my Property Possession themes with a handful of smart purchases for around $100.  From there, you can add as you desire, growing the display as you find more treasures over the years or you can choose to leave it at it's economic perfection.  As I was feeling rather low, I hit the nearby Home Depot for some Halloween Retail Therapy and bought everything for a Witch's Lair display, including the pumpkins.  Here's how I did it.


Shopping List:
1x Wood Crate                         $12.98
1x Lantern Candle Holder        $13.98
2x Metal Paint Bucket              $10.44 (pack of 3)
1x 3/8x 50ft Manila Rope         $9.97
1x Jute Twine                           $2.87
1x Steel Pail                             $22.88*
BBQ Brush                               $5.98
Paint Brush                              $2.00
Cinnamon Broom                     $4.99

Total:                                        $86.04 (w/o tax)

*This is an old pail I have been using for years to mix concrete for my tombstones so technically I didn't need to purchase it this go around.  I've included the cost to be fair.

The following are items I always have on hand for crafty stuff.  Whatever you can't find at Home Depot you can pick up at the grocery or dollar store:

Paper Towels
Distilled Vinegar
3% Hydrogen Peroxide
Salt
Lemon Juice
SOS Pads or Steel Wool
Rubber Gloves
Goof Off (degreaser)

2x Pumpkins
    *At Home Depot they were around $5 a piece which is a great value.  Add to your discretion.  My personal minimum of double digits had to be curtailed this year.  Grr.

I aged the crate with my favorite SOS Pad solution and rusted the buckets over the course of 2 days until I got the color and look I wanted.  That's pretty much it! 

Stacking rusty metal buckets is another idea I've been wanting to share.  Straw bales and crates are great, I obviously very much like crates.  It just felt like in order to have fun with levels and height, that's all there was.  Meanwhile, I was working on my rusted buckets post which produced, mildly put, A LOT of buckets.  And when you're doing things like this to make it happen:


...funny how creative genius works.  The crate reached a particularly lovely deep grey color; SOS Pad solution still beats Steel Wool in my book.

The lantern was discovered in the clearance area they set up outside the store, an area that frequently offers up great props at a great price, especially candle holders & lanterns.  What would have been a lovely lantern for an outdoor summer dinner party is now at half the price and ready to illuminate a haunt instead.  P.S. Later I picked up one more VERY cool lantern online that was also on sale not because the display really needed it, I just couldn't help myself when confronted with it's coolness. 

Just those items alone produces a display rich in color and texture that could take you all through Fall.


From here, just about anything could be added to this base over the holiday, the months, or years.  In my case, it was more like hours.

My 4 year old has an eye for the Nefarious by Nature and found some old wasps nests, a Magnolia tree seed pod, feathers, oak tree branches with lovely green lichen, and some detritus from a tree that look like snakes.  Corn stalks were picked up from Michael's "Fall Foliage Sale."  A fossil, picked up on a trip to Wyoming many years ago, was found in a drawer at my dad's and ticks both the Nefarious by Nature box and Sinister Souvenir.

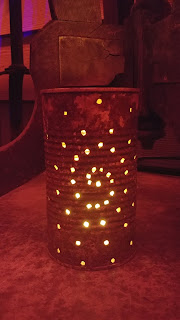
My Haunter Hoarder stash contributed the rusted tin can and stained glass jar.

Goodwill offered up some Thrifty Thrills in the form of a pillar candle stand, small engraved metal pitcher and an engraved metal ball.  Side note, my metal bucket stash was mostly built from thrift stores.  Beverage buckets, buckets from gift baskets and flowers, etc. often find their way to these stores so you can stock up on metal buckets in all sorts of sizes and shapes for far less than retail.  My amazing stash that sits, scared and sad in a POD in Oakland, will eventually make for a killer post. 

I also wound up getting a roll of burlap and made a creepy cloth drape for the door and used the rest to cover up some building supplies that were seriously effecting the Halloween vibe.  Burlap has many uses in a haunt, from false walls, to covering areas you don't plan on decorating, to creating vines or creepy curtains.  And all for under $11!

Here's the end result.  I really wish I had access to my antler sheds as I think they'd look great in the mix.  Otherwise, I'm very pleased with my set up and can't wait to show you how to flush out more haunt themes without breaking the bank.


3/8 Manila Rope threaded through the burlap, hung from hooks.
I cut the rope long so it would hang down & then used it to tie the
"vines" back so we weren't getting tangled every time we went in or out

Untied, blowing in the breeze.  Creepy!

Thursday, October 17, 2019

Pantry Potions: Supermarket Sorcery

When inspiration hits, using supplies already in the pantry means not only savings but seriously cuts down on prop making prep time.   Warehouse-style food and supply stores allow you to buy in quantities that cover both your cooking/cleaning and crafting needs.

Here I've consolidated a list of techniques utilizing common household items.  There's all sorts of info online on each - videos, variations on recipes, etc.  Experiment and find the one that's right for you.  And please share the results and other recipes from your book of spells.

14 days till Halloween...

Technique: Antiquing Wood
Needs: Steel Wool or SOS Pads, tea, coffee
Most of the info out there will tell you SOS Pads don't work.  I disagree so I'm linking my own post about this technique and you can decide for yourself which is "better."

SOS Pad on the left, Steel Wool on the right

Technique: Rusting Metal
Needs: White Vinegar, Salt
Did this for the first time this year and it's just fascinating.  Science and art, doesn't get much better.


Technique: Staining/Aging Natural Fibers
Needs: Tea, Coffee, Pomegranate, Turmeric, Beets, Wine, Baking Chocolate, Soy Sauce, Salt
Prepping the fabric is key.  After that, it's really up to you what recipe you go with.  Tea, coffee, chocolate and soy sauce lead to browns and tans.  Beets, Wine & Pomegranate various reds.  Turmeric a bold yellow.  I like to leave coffee grounds & chocolate clumped up in areas to create darker spots & more nuance.  Be sure to thoroughly wet the fabric before and add salt to the dye bath if you're using cotton.  All of these work well on wood as well.  Age some planks and add some "blood" stains with wine, beets or pomegranate for a battle beleaguered ship deck.

Coffee, tea, chocolate, turmeric

Technique: Dried, Scabby Blood
Needs: Corn starch, corn syrup, onion flakes, red food coloring
Cake this up on gardening and work tools for October, wash off for the boring non-Halloween months.  Looks great, easy to make and easy to clean up.

Technique: Fake blood
Needs: Corn syrup, chocolate syrup, red food coloring
Mix in other things like peanut butter or oatmeal to change up the consistency depending on your needs

Technique: Aging Bottles
Needs: Corn starch, corn syrup, white vinegar
Basically you're making glue.  Use sandpaper to scratch up the sides of the glass bottle or jar.  Paint on your homemade glue mixture, whipping off when it's still tacky.  Mix in coffee grounds or dirt for an extra grimy effect or stain with Turmeric for yellow or beets/pomegranate for red.


Monday, September 23, 2019

Pantry Potion: Antiquing Wood - Steel Wool vs. SOS Pads


There's a lot of information and how-to's on antiquing wood using vinegar and steel wool.  It's a really cool trick that's cheap and easy with simple household items - the perfect DIY project.

All the info out there concurs one critical point - SOS Pads don't work as well. Some will straight up tell you they DON'T work and not to use them.

Funny thing, SOS Pads are all I had ever used.  I guess the first tutorial I used years ago didn't mention this fact or I overlooked it.  If memory serves - which it often doesn't - they may have actually used an SOS Pad as I have vague memories of a picture of that easily identifiable blue pad sitting in a jar of vinegar.

Regardless, I needed to antique some wood for my Gothic Window and that's when I came upon all the SOS Pad warnings and chuckled.  All my crates look rad if you ask me.  Could there really be that much of a difference?  Time for an experiment.

Before we begin, the basic antiquing recipe:   Fill a jar with white vinegar and plop steel wool inside.  Let it sit.  An hour or weeks, whatever.  The longer the murkier the liquid will get but honestly this works after a few hours, too.  Then you just "paint" the liquid on using either a paint brush or the pad itself.  Wear gloves, this stuff gets messy.

The recipes all call for some tea as well.  I let loads of bags sit for a long time in a separate container, sometimes even adding coffee grounds.  Since I'm going for creepy crate vs wine crate it doesn't have to be perfect.

One note of caution with the SOS Pad: the blue soap can clump and stick to spot leaving blue stains.  Use the tea/coffee solution to water these areas down and disperse/diminish the blue.

I like to do a base of the vinegar/pad solution and let that dry.  After that, it's the perfect science of slop a little of either or both, just let it go and feel it.  Become one with the crate.

On the left, we have the SOS Pad crate and on the right, the Steel Wool Crate.  Here we are after the first coat of solution.  Having never done a pure steel wool one I was blown away with how fast it works!  It gets dark FAST.  Which is cool especially if you're going for more of a wine crate look.  I did the SOS Pad one first so it's been sitting for about 20 minutes when I took this photo:


Pretty crazy, right?  Almost looks like I haven't done anything to the one on the left.  I meant to take a "before" picture but my 3 year old daughter made a mad dash from her bedroom, out the backdoor and then down the driveway which, big surprise, distracted me every so slightly.  My apologies, would have been nice to have a baseline.  Next time.

After a while I came back and did another coat to the SOS pad as well as some tea to both.  The Steel Wool crate was pretty well stained at that point so I wasn't able to have as much fun creating irregularities with it.  I probably should have gone back and forth between tea and vinegar solution on the first coat.  

I did one final coat on the SOS pad one, just finishing off the liquid and added tea as well.  I did another round on the steel wool one as well trying to layer it up in some areas to create greater depth.

Left them overnight and the final result....?


You can absolutely antique wood with an SOS pad.  They're almost identical with the SOS pad leaving the crate a greyish brown and the steel wool creating a deep reddish brown.

I prefer the look of the SOS Pad.  I think it works far better for a haunted house as it's less "winery wedding" and more "witch's storage."  Whatever you wind up using at least now you know you have options and an SOS pad isn't steel wool's less crafty sibling.

Which crate do you prefer?


(in this light you can hardly tell them apart)

(Such a subtle difference)

(the end of the SOS crate didn't take the solution as well this time, but who can tell at night?)

UPDATE!!!
It's now been 3 days and the difference is even more pronounced.  The SOS Pad has deepened it's grey/brown color all over while the steel wool one is more red toned than ever.  Perhaps it's an illusion but there you go, can we just admit that and SOS pad not only works but also looks killer?!?

The difference is crazy! (SOS on left, Steel Wool on right)


Home Improvement Haunt

Context is everything.  In the right environment a common item can take on a whole new spooky life with or without minimal adju...