Showing posts with label halloween DIY. Show all posts

Friday, April 3, 2020

Swamp Lamps: Alluring Illumination


With containment comes time.  Lots and lots of time.  I worry what the future is going to look like.  When October comes, will we feel safe and comfortable going from house to house, drawing close to each other, hands diving into a shared bucket of candy, without fear of deadly germs?  I know it seems silly to think about but it's the normalcy of traditions like Halloween night I miss.  Heck I miss even the freedom of thinking about silly things.

I figured the best therapy would be to plug forward as if all were going to be the same and get to prop making.  I have a long list of stuff I want to try and managed to somehow start 3 all at the same time.  The first to completion (or near completion at least) are these gobsmacking swamp lamps I found via Pinterest & the Halloween Forum.

You can find the instructions here.  They're well written and clear; I pretty much followed them to a tee.  What I posted here are actually the 2nd and 3rd pass at the project.  I kinda messed up the first one when I got to the painting step and I could kick myself.  It's vitally important to use a wash or water down your paint.  It's what gives it the more natural look vs just some craft paint on CelluClay.  And take your time, layer the paint.  You can always add more but you can't take it away.

This was my first time using CelluClay and I LOVE it.  What a fantastic product!  If you haven't used it before, I suggest starting at the base of your lamp where you can experiment and hide "mistakes."  I decided to go over the CelluClay with water using either my finger or a paint brush to smooth it out in an effort to match the smoother texture of driftwood.  I used the CelluClay to bulk up areas, built "bridges" between the bamboo - anything to hide the distinctive look of a tiki torch.


Be patient with the paint, slowly building up the color
for greater realism. 


My daughter and I gathered the wood and some of the shells on a beach trip, the rest was stuff from my stash.  Shark teeth, shells, beach glass....honestly I had a hard time stopping, I just kept thinking of fun things to add.

The shark teeth were found "panning" at a pumpkin festival.
My daughter did gems, I wanted fossils. We both were happy.


Like the "seaweed!"  At first I was going to add moss but then started to worry it would just dry and eventually fall off.   Switching course, I dyed some cheesecloth green (I did two pieces, soaking one longer than the other to get different shades) and then cut small squares.  After pulling at it a bit, stretching it out, I used matte Modge Podge to adhere it to the sides.  I gently brushed more Modge Podge in other areas of the cheesecloth to give it a wet look.  The result is somewhere between seaweed and fishnet, either of which works just fine for me!

Seaweed clings to the outside as light illuminates the creepy
interior of the lamp base

Last note, I realized too late on my first one so remedied it here - it's really incredible when the light is able to find it's way DOWN through the bottom of the jar.  It illuminates the space adding even more visual interest.  I try to keep the tape and CelluClay to a minimum on the underside of the jar.  To cast light both up and down, I taped two LED votive candles end to end.  

This is not an afternoon project.  I worked on mine over days, if not more.  It takes time for things to dry.  And if you're like me, you'll keep thinking of new ways to make it cool thus drawing it out longer.  But man is it worth it.  I still can't believe I made something so cool!

Be safe, we'll be haunting together soon...I feel it.

211 days till Halloween...


My daughter knocked this one over, snapping all the sticks
above the lip of the jar.  After a cry, I got some wood glue and
got to work.  You would have never known, would you?


Sunday, November 3, 2019

Haunter Hoarder

A sauce jar turned Witch's Jar and
former libation & oil bottles create a
creepy corner
Sigh, the Most Wonderful Time of the Year has passed and the post euphoria melancholy begins to set in.  The antidote?  Planning for next year!

Repurposing everyday items falls perfectly in my cheap & easy decorating philosophy.  Stockpiling these empty or used household items keeps the DIY supply high and always at the ready when inspiration hits and time allows for prop making.  Check out this list of items and how to use them in your haunt.


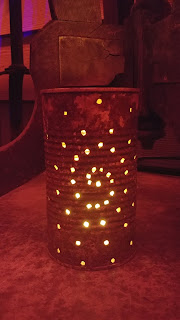
Tin Cans - Hold onto the cans from everything from coffee to baked beans to acquire an assortment of sizes.  Pierce a design in with a hammer and nail and then rust them up with a salt & vinegar rusting solution for fantastic luminaries.  Add a creepy label to a rusted can to stock an apothecary.  Add some rusted cans to a Cabin in the Woods haunt to give it an "abandoned, no help is coming" feeling.  Note: be sure to hammer down any sharp edges leftover from removing the lid.


Baked beans...swirly luminaria

Glass Jars - Gonna need glass jars for Witch's Jars.  Large pickle jars are fantastic as well as supersized jars of spaghetti sauce.  Use smaller jars like olive & pesto jars and add labels for an apothecary.  I love Oui Yogurt jars for tea lights sized holders.  Ball sells metal tops with hangers that fit some wide mouth jars allowing you to create hanging lanterns for a cemetery, Pirate Ship, or Priestess Shack.


Oui Yogurt jars (2nd from left) have
a lovely shape


Glass bottles - Wine, olive oil & liquor bottles and their unique shapes add visual interest to an apothecary.  Remove the labels and add your own and wrap raffia around the necks.  Or leave the labels, age them and add to a Haunted House or Pirate Ship.  Hold onto the corks so they can be placed back in to appear still full of vintage libations.  Cider bottles are perfect for Pirate haunts or Cabin in the woods.  Stain the inside of clear bottles with Modge Podge dyed with food coloring and bake for 1 hour at 200 degrees for a cool stained glass look.


Tin Containers - Mints, tea, spices, hot chocolate; tin containers can be rusted or simply add a label and added to a Haunted House, apothecary, Pirate Ship or Cabin in the Woods.


Medicine bottles - Remove labels and use a glue gun to write the contents on the side.  Paint with silver, gold or bronze paint and distress to create potion ingredient bottles for an apothecary.


Flowers/Bouquets - If you're fortunate to get flowers show them new appreciation by adding them to a haunt.  Hang upside down to dry after enjoying their fresh blossoms.  Add to an apothecary, Shack or place in a aged vase (use the one it came in!) in a Haunted House display.


Vases/Gift Baskets - Speaking of flowers, vases are more than glass.  Metal, birch, wood, baskets, and more.  Hold onto the cool one's and toss the tacky to add to Pirate Ships, Haunted Houses, Swamp Shacks, Cabins in the Woods...honestly, they can find a home just about anywhere.  The wood box shaped one's can be turned on their sides, stacked and glued together to create a shadow or storage box display.  Gift baskets can be added to Witch's Lairs, Swamp Shacks, Haunted Houses, Undertakers, Tombs/Crypts and more.

Rust this pail up with a salt & vinegar solution

Naturals are perfect for a Witch's Lair or Swamp Shack

Stack these on their side to create a multi-compartment display

Fill with dried fruit or skulls. Age the wood with an
SOS Pad/Steel Wool solution and metal band with a
salt & vinegar solution.

Food & supplies for the Pharaoh in the afterlife were stored in
baskets not too dissimilar to these.


Bottle Caps - Make a hole and add to a mobile or create a wind chime.  Place in the eye sockets of a fake skull.


Ribbon/Yarn/String - This can get overwhelming so be sure to only hold onto the good stuff.  Wrapping these days is so "cool" it often means twine, burlap & yard.  The pieces may not always be big, but you only need a little to wrap the neck of a bottle or to hang a mobile.

362 days till Halloween....

Wednesday, October 23, 2019

Spider Infestation: Quick & Easy Pipe Cleaner Arachnids


When I was doing the original Spider House theme for my house, I didn't want just a few spiders, I wanted a full on infestation.  There are plenty of commercially made spiders available in all colors and sizes and for the most part, they are a decently made prop that will last a good amount of years.  However it was going to get expensive if I wanted the place crawling so I needed an alternative.

Meet the pipe cleaner spier.  6 extra long pipe cleaners per spider.  They're not too hard, by the 3rd or 4th you'll have the technique down you can quickly crank out dozens while watching TV.

8 days till Halloween...


Supplies: 6 Extra Long Pipe Cleaners

Step 1: Fold 4 pipe cleaners in half.

Step 2: Fold these 4 in half again.

Step 3: Bend the tips slightly to create feet

Steps 1, 2 & 3

Step 4: Line up the "V" of two of the legs and wrap one of your straight pipe cleaners around it twice.  Make sure to pinch the initial wrap tightly to secure it and the legs together.
Step 4

Step 5: Wrap the pipe cleaner twice more, this time outside of the "V."  This is the "body" of the spider.  Again try to keep these wraps tight.
Step 5

Step 6: Line up the remaining 2 legs and wrap the pipe cleaner around the "V" twice.

Step 6

Step 7: Repeat the wrapping process with your 6th pipe cleaner.  This pipe cleaner is to bulk up the body and make it more sturdy so wrap and pinch as you see fit.

Hello spider
The feet can be pinched around fake spider web so you can hang wherever you want.  They also slide nicely into the spaces on a screen so cover windows and screened doors with them.             

And there you go!  Spiders!  Back when I was working on Dancing With the Stars was the first Halloween episode.  The Production Designer thought my spiders were so cool, he added some to the set including the background of Tom Bergeron's primary spot.  I was so proud!

Another option:

Pipe cleaners and egg shaped styrofoam balls painted black.  Pretty straight forward.  Key with these, and the others, is getting that bend right in the leg.  The right bend makes them look more realistic and highlights that elevated structure that causes chills.

Add a red glitter glue hourglass for a Black Widow


Monday, October 21, 2019

Bargain Boo: Haggling for Horror

eBay score

Any which way I can save a penny or dollar, I'm all in.  Repurposing common household items and tools, great deals at thrift stores, eBay's massive market place or my personal favorite, free items either left curbside or found in nature all enable us to build out our haunts without going broke.

You can take the savings even further if you're willing to haggle.  I know it can make some people uncomfortable.  It's not really in our nature to enjoying hearing "no" and often we're concerned about insulting people.  I've got to tell you, the more I haggle the better it gets.  There are opportunities to negotiate better prices in ways you may not have realized as well as the means to improve your odds sometimes right under our noses.

Use these tips for more than just Halloween shopping, too.  Although other than grocery shopping, what kind of shopping is there?

eBay - I buy and sell a lot on eBay so I'm giving this advice not just as a buyer, but a seller.

First off, make good use of the "Make an Offer" feature if the listing is open to it.  As a seller, we want to sell stuff and if we've said we're open to offers, we mean it!  Make us an offer!  If we've had the item awhile, we're likely to jump at the chance to finally get whatever it is out of our house.

Which brings me to "View all revisions."  All listings have an area that allows you to see revisions.  It's found in the Description and is highlighted blue.  In the pic below it's purple because I've selected it, I wanted to be sure I had found us a good example.


This handy feature holds the key: data.  Here you're going to see how long the item has been up, what the seller changed, if the price dropped, by how much, how often, etc.  Has the item been up for ages, dropping steadily in price?  If so there's a pretty good chance the seller wants it gone and will accept a low offer.  So let's see what our example has been up to:


Okay, so this item hasn't been up long, but they've changed the Buy It Now Price a lot.  Also, they are currently offering it at a 42% off.  So I'm going to make an offer that is just slightly under that price.  They clearly want it gone but given they're promoting a discount, they likely are close to their low end limit of what they'll accept.  I'll let you know how I do.  UPDATE:  Not bad, wound up at 48% off original list price.  The free shipping meant they weren't willing to go lower. I've done better but still, not bad.  I'm happy with the price I paid total for the item and that's all that matters.

I've seen items up for over a year and offered half of what they had it listed for.  Wouldn't have been able to afford my wedding if I hadn't!  Then turned around and resold most all of it on eBay again and turned a small profit.

On that front - look for items that might need a bit of work, too.  Unpolished silver often sells for far less than polished as it just doesn't present well in pictures.

Make sure you are keeping your shipping costs in mind when making an offer.  You don't want to find yourself happy with the purchase price only to get dinged with shipping costs.


Best. Craigslist. Find. Ever

Craigslist - I could be wrong but I pretty much assume anyone using Craigslist understands that it's all about the haggle.  I don't presume to ever get paid what I listed something for and likewise, never simply just pay what someone is asking.  So of all places to not feel weird haggling it's Craigslist.

When someone is having a hard time getting rid of an item, the tend not to remove previous listing but simply post a new one, lowering the price.  If you find something you like, scroll back through the results to see if it's been listed before and take note of the time passed and price drop.  I then offer them whatever price they would be at if they had to post it 2, even 3, more times and we usually wind up somewhere in the middle.

For example, say the listing started at $60 and every 5-6 days they've dropped the price $5.  It's now been 15-18 days and it's listed at $45.  Another 10 days they'd be at $35 so I offer $25 or $30.  When things sit there for a while, folks start to worry it won't sell at all and most sellers on Craiglist are there because they're trying to get rid of stuff and/or make quick cash.


Secondhand Stores, Yard Sales, etc - These two techniques work in kitchen supply stores as well.

Dust equals discount in my book.  Dust means it's been sitting there.  A while.  You can see it, they can see it, everyone knows what's going on.   We'd practically be doing them a favor to take this thing out of their store for them.  Make an offer!  Heck even point out that it's so dusty they must have forgotten they even had it.

Buy a lot, pay less.  A "lot" as in a group of stuff.  Gather up what you think you may want, do some quick math and offer less.  To increase the odds of victory even more, offer a nice round number that makes life easier for everyone.   If the total adds up to $24, offer $20.  If it's $26, offer $20.  People seem to like $20's by the way.  $20, $40, $60.  They know you likely have exact change and they don't have to make change.  Even if it's $75 offer $60.  You've got nothing to lose except savings.

Be willing to let things go.  If they don't take the bait at first, start sliding things aside you could live without and see if you can get them to come back to the table.

My kitchen store is a fan of "lots."  They've given me discounts without even asking simply to make their lives easier.  So gather up some dusty Arabic Tea Pots and cake stands and start making some deals!


10 Days till Halloween...

Thursday, October 17, 2019

Pantry Potions: Supermarket Sorcery

When inspiration hits, using supplies already in the pantry means not only savings but seriously cuts down on prop making prep time.   Warehouse-style food and supply stores allow you to buy in quantities that cover both your cooking/cleaning and crafting needs.

Here I've consolidated a list of techniques utilizing common household items.  There's all sorts of info online on each - videos, variations on recipes, etc.  Experiment and find the one that's right for you.  And please share the results and other recipes from your book of spells.

14 days till Halloween...

Technique: Antiquing Wood
Needs: Steel Wool or SOS Pads, tea, coffee
Most of the info out there will tell you SOS Pads don't work.  I disagree so I'm linking my own post about this technique and you can decide for yourself which is "better."

SOS Pad on the left, Steel Wool on the right

Technique: Rusting Metal
Needs: White Vinegar, Salt
Did this for the first time this year and it's just fascinating.  Science and art, doesn't get much better.


Technique: Staining/Aging Natural Fibers
Needs: Tea, Coffee, Pomegranate, Turmeric, Beets, Wine, Baking Chocolate, Soy Sauce, Salt
Prepping the fabric is key.  After that, it's really up to you what recipe you go with.  Tea, coffee, chocolate and soy sauce lead to browns and tans.  Beets, Wine & Pomegranate various reds.  Turmeric a bold yellow.  I like to leave coffee grounds & chocolate clumped up in areas to create darker spots & more nuance.  Be sure to thoroughly wet the fabric before and add salt to the dye bath if you're using cotton.  All of these work well on wood as well.  Age some planks and add some "blood" stains with wine, beets or pomegranate for a battle beleaguered ship deck.

Coffee, tea, chocolate, turmeric

Technique: Dried, Scabby Blood
Needs: Corn starch, corn syrup, onion flakes, red food coloring
Cake this up on gardening and work tools for October, wash off for the boring non-Halloween months.  Looks great, easy to make and easy to clean up.

Technique: Fake blood
Needs: Corn syrup, chocolate syrup, red food coloring
Mix in other things like peanut butter or oatmeal to change up the consistency depending on your needs

Technique: Aging Bottles
Needs: Corn starch, corn syrup, white vinegar
Basically you're making glue.  Use sandpaper to scratch up the sides of the glass bottle or jar.  Paint on your homemade glue mixture, whipping off when it's still tacky.  Mix in coffee grounds or dirt for an extra grimy effect or stain with Turmeric for yellow or beets/pomegranate for red.


Wednesday, October 16, 2019

Kitchen Killers


We've explored the Home Improvement store and Thrift Store for budget friendly Halloween props.  Now it's time to give the Kitchen Supply Store some love.

My go-to here in LA is Kitchen Depot in Glendale.  Well stocked, great prices and I'm a big fan of the owners who are helpful, friendly & hardworking.  I go year round for all sorts of needs - before camping or festivals, parties, Christmas & Housewarming gifts so have gotten to know the store fairly well.  Even then, I feel like I'm constantly discovering some new corner or item I never knew was there.  Smart & Final has a decent selection of kitchen supplies to explore as well.

I've cooked up some ideas that are either display ready or DIY to varying degrees.  If you're doing a Pirate theme, Haunted House, Witch's Liar or Priestess Shack, the kitchen store is literally aisles and aisles of opportunity.  Take your time, look high and low, there's always something interesting stuck in a corner.  Prices and stock are constantly changing, look for things already marked down that are gathering dust and offer them even less.  They're looking to move stock so give them a reason to say "yes."

Don't forget these are real, ready to be used kitchen items so consider safety when displaying.  Dull knives and secure breakables, etc. as needed.


15 days till Halloween...


Knives & Cleavers - For Kill Rooms & Slaughter Houses, Dungeon's, Witch's Lairs and Voodoo Priestess Shacks...everyone could use a good knife.
Bloody up knives you use year round

Cheese Cloth
- For creepy curtains or mummy wraps, can be dyed yellow/brown for an aged look or grey/black for old curtains.


Coffee Warmers - Add to an Apothecary, Witch's Lair, Voodoo Priestess Shack or Laboratory.  They come in assorted styles and finishes.


Arabic Tea Pots - Shapley and eye catching both of these were on sale right by the door for 50% off.  Probably could have offered even less and walked out the door with them.


Cooling Racks - Spray paint these black and attach hanging planter chain to the feet.  Viola!  Pumpkin hanger.  Glorious hanging prop.


Metal Colander - Same vein as the cooling rack, spray paint and attach planter chain. to the handles.  Fill the basket with skulls & Spanish Moss, rotten apples, body parts, pearl necklaces & treasure, whatever you haunt needs more storage space for.  Bonus points for hanging prop!


Wooden Ladles & Spoons - For stirring potions, of course.

Look at this big bad boy. Perfect for
stirring bubbling cauldrons of potion
Great colors and visual intrigue
Ladles & Fry Baskets - For more brew making...


This ladle is like 3 feet long

Mortar & Pestle - For grinding Nightshade...or bones


Gotta love options
Clay Jars - Canopic jars for a tomb or for storing potion ingredients.


Pot Fork
- Makes "meat" transportation and cooking much easier, wouldn't want to get all that blood on yourself.

Garlic Crusher - Variation on the Mortar & Pestle, specifically designed to repel vampires.


Turkey Lifter - These seriously look like they're up to no good


Steel Wool - Plop a wad in a container of vinegar and let sit for hours or days to create the perfect solution for antiquing wood (18 pcs for $0.99!!)


Brooms - Typically they carry a variety.  Antique a bare, new wood handle with a Steel Wool/SOS pad solution

Wild, raw fiber look and inexpensive

BBQ Claws - I shudder whenever I see these.


Compass Saw - Every Slaughter House needs a variety of saw options


Metal Cups & Serviceware- Gotta keep your rum safe on a ship as it gets tossed by the seas.  

I can almost smell the salt air and bone soup

Coffee/Tea Sets
- Even witches, beggars, blighters and ne'er-do-well-cads like a cup of tea.  Just don't ask what's in it.  A fine addition to a Haunted House, Witch's Lair or Priestess Shack depending on which style you choose.  A perfect year round product that get's to role play in October.


Watch for sales, or dust and make an offer

Cups & Glasses - More treasure for a pirate or for elegantly serving witch's brew.


Woven Baskets - More storage for the shack or lair and at $0.99 there's no reason not to pick some up.


Incense Burners - This will likely depend on the owners of your supply store.  Kitchen Depot also sells incense and scented oils for oil burners.


Gathered on journeys to far flung places, these burners entice the
nose with fragrant secrets

Scented Oil Burners & Candle Holders - Real opportunity for oddity here plus the scented oil adds mystery to the air.

Giraffes? Dragons? Giraffe dragons?

Random Egyptian themed candle holder for a tomb haunt

Vases & Bowls - Beautiful booty or bizarre bauble, this random find would catch any pirate or witch's eye.

So weird it's simply wonderful

Metal Buckets - Rust it up with salt & vinegar or leave be, metal is Halloween ready for a Pirate Ship, Lair, Shack or Haunted House.


Stainless Steel Skewers - Ominous, long blades are so great.  Just like, in general.  So many questions.  Mostly, "why do you have those and what do you use them for?"

Skewers for days

Utensil Holders/Displays - This will vary on your location but they typically are fantastic and reasonably priced.  Use as treasure on a Pirate Ship, or for a Haunted House or Lair.  Another item to be willing to haggle over.  Buying more than one makes negotiating even easier and everyone feels victorious in the transaction.


A table set for dinner or a highboy filled with all this booty and
you may find yourself fighting off an invasion

Utensils
- Gold utensils pilfered from a Galleon are perfect for a pirate.

So much treasure...

Haunt Supplies - Latex gloves, tape, glue, super glue, string, trash bags... all the nuts and bolts at rock bottom prices.  If you're already there, stock up!


Gloves for everyone!


Home Improvement Haunt

Context is everything.  In the right environment a common item can take on a whole new spooky life with or without minimal adju...